Interfacing and Controlling OBS (or Streamlabs OBS) with Faithlife Proclaim
Introduction
My church has recently decided to start live streaming our services to Facebook. I thought it would be nice to integrate Proclaim to OBS so I could automate OBS scene changes depending on what section we were in on proclaim. Ideally, when we are in the pre-service loop and countdown sections, OBS would show a full screen view of Proclaim, but once we transitioned to the service portion of proclaim we would switch to theme that showed our camera with proclaim in the corner.
Fortunately, I was able to achieve this fairly easily using Proclaim's built-in Lighting/MIDI function which allows you to control any Midi devices directly from proclaim. We will be using a couple of free software applications to achieve this; they are loopMIDI and MIDIKey2Key. We will use loopMIDI to create a virtual Midi device that proclaim will send commands on. On the receiving side, MidiKey2Key will listen for commands on this same virtual MIDI device, process the incoming data, and perform actions that we have set up(in our case, pressing OBS hotkeys).
Links:
loopMIDI
MidiKey2Key
OBSMidiRemote (Note: I didn't actually use this program, but it is an alternative to MidiKey2Key that can accept Midi input and communicate with OBS over it's web service)
loopMidi Setup
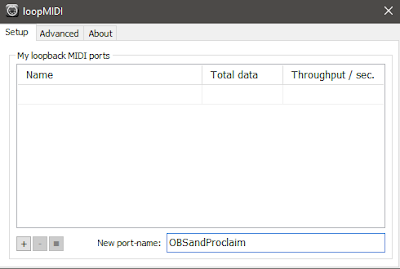
Download and install loopMidi from the link above. Once the install is finished, launch loopMIDI. At the bottom of the window, there is a field labelled New port-name. Here you can input the name of the virtual midi device you want to create. In my case, I used "OBSandProclaim". Once you choose a name, click the little '+' button to the left of the field. If created successfully, you should now see your port listed in the main part of the window.
Proclaim Setup
Proclaim setup is fairly straight forward. Open up Proclaim and go to the Settings > Lighting/Midi menu option. On the window that pops up, click the "Add Scene" button. Give the scene a name, in this case, I will be using "Test Scene". Click the Add Control selection box and select MIDI. In the Midi grouping, for the device, select the virtual device you created in loopMidi (in my case it was OBSandProclaim). Now you need to select the a Midi command and number. These can be whatever you want as long as you are consistent between Proclaim and MidiKey2Key, but I decided to use the 'Program Change' command and I started my numbering at 0. Keep the channel at 1. You should repeat the process of creating a new scene in proclaim for each command that you will want to issue. Make sure to increment the number when creating multiple commands.
Now that we have the scene setup, we need to add scene signal to our service schedule. To do this, you must be in edit mode. You can add a signal to any item in the service schedule whether it be an image, video, verse, etc. I decided that I was going to use a dedicated stage direction cue so it would be easily identifiable in the schedule. To add a signal to a schedule item, first select the item in the left hand menu. Once you have an item selected, head over to the main content area. At the top of the area, should notice a few tabs, one of the being "Signals"; select this tab. Once you have the tab selected, click the "Add Signal" item, go to Lighting, and then select the desired scene. Now once the schedule item with the signal goes live, proclaim will send the midi command.
MidiKey2Key Setup
MidiKey2Key is a little more complex than the other program, but it becomes pretty easy to navigate after working with it for a few minutes. On first startup of this program, you will be notified that the program could find load a config file and that you need to create a new one. To do this, go to File > New. Create a file somewhere and it would probably be a good idea to back this file up somewhere after we make our changes. Once a new profile is created, you should be able to select the Midi Input and Midi Output devices. Choose the virtual MIDI device you created for both fields.. If you followed along with my naming scheme, it will be OBSandProclaim. Now to the right, check the "Log to Window" checkbox and click then click the start button. The Log to Window function is very nice because it will show a log of all commands that it receives in the bottom of the window. This is an easy way to get the raw data values of the Midi commands that we put into Proclaim. If you created a command as a program change with the number 0, the raw data value would be C00000. To find the raw data value of your commands, open proclaim and go back to the Lighting/Midi window. In your list of scenes, click the edit button next to one of the scenes. On the edit scene window, at the bottom center of the screen there should be a blue link that says "Preview". If you click on the "Preview" link, it will send that command through the virtual midi device and into our MidiKey2Key program. Look at the data field in the log area to find the value number.
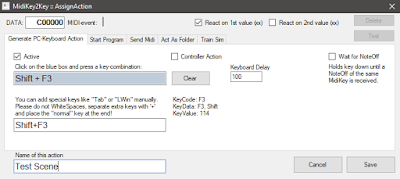
Now that we know the command value, we need to create an action that MidiKey2Key should be when it receives a command. To do this, click on the 'New' button located on the right side of the window about 1/3 of the way down. To control OBS, we ill need to generate a PC keyboard action which is the already selected tab. On this window we need to fill out three fields: DATA, Key Command, and Name. The data field is at the very top of the window. In this field, you should type that data value we retrieved from the log in our last step. If you command was a program change with the number 0 then the DATA value will be C00000. Next you will need input the hotkey you have set up (or will set up) in OBS. In my case I am using Shift and F3. You can click inside the blue box on the screen and push the desired hotkey and it will automatically read it. If you are using a special key in the shortcut (such as the tab key or windows key) you can use the white field directly below to manually type that in. Finally, you need to give the action a name. I decided to make the name match the name I gave the scene in proclaim. After this, click save and repeat this process for any additional scenes.
OBS (or Streamlabs OBS) Setup
The only thing that needs to be setup in OBS is the hotkeys. This is pretty self-explanatory, but I figured I should briefly cover it anyways. Open up OBS and go to settings > hotkeys. Now in the list of scene groups, find the scene you want to assign the hotkey to and then find the input box next to the 'Switch to Scene' item. Click in this input box and press the desired hotkeys that match the hotkey that you set up in the MidiKey2Key program.
Testing
If you setup everything correctly, you should be able to use proclaim to trigger a scene change in OBS. To verify put Proclaim in 'On Air' mode and select the items you put signals on. As the item becomes live, the midi command will be sent from proclaim over the loopmidi virtual device to the MidiKey2Key applicaton. MidiKey2Key will process the command it received and then emulate pressing the hot key that you set up.
Sidenote - Streamlabs OBS and Facebook Live (and the removal of Game Selection)
In our streaming situation I decided to use Streamlabs OBS (or SLOBS) to do our church live streams to Facebook Live as simplifies the creation of a live stream to a few button clicks, all within the program. However, for some reason Streamlabs decided to require you to select a video game when starting a stream. When searching the Streamlabs community on how to bypass this, Streamlabs staff comments were generally that their target audience is the gaming group and there is no way to bypass this, but you could log into facebook and edit your live stream to unlink the game once the stream has started. I felt this was ridiculous as it negated the whole benefit of using SLOBS.... Anyways, since the software is open source, I decided to modify the software so selecting a game is now optional when creating a stream.
If you are in the same position as me and would like my version to use my version of Streamlabs OBS that allows you to start a Facebook Live stream without selecting a game, you can find it on my Github. All you should need to do is download the latest setup.zip and run the installer like the normal version of streamlabs.


Thank you so much for taking the time to put this together. This guide was very well written and helpful. I really appreciate the time you took to outline every step with specifics. You have allowed me to automate aspects of our service which hopefully will allow me to more easily recruit assistance for those Sundays when I will be unavailable, keeping us online to share the gospel.
ReplyDeleteGlad I was able to help!
DeleteThis is great! I'm with Adam; we'll be able to recruit "normal" people to run Proclaim/OBS/Zoom with this. Thank you.
DeleteThank you so much for explaining this so clearly! I have been wanting to do exactly this for months now; I don't know why I didn't find your post sooner. I had tried to do exactly what you have detailed here, but was not able to figure out the whole MIDI Hotkey communication piece. Thanks again! (I might be able to go through an entire service without being preoccupied with the livestream and every scene change....My wife will thank you too!)
ReplyDeleteThank you so much for this creative approach! This will allow me or anyone else I train to do a much better job of controlling the flow of OBS. Since it is a small church it is just me and inevitably I get distracted and miss some transition no matter how hard I try. This will allow those to just automatically happen. As Dave said, this will make it MUCH easier for anyone to run OBS and will make it a much more consistent experience.
ReplyDelete